Creating Campaigns
Creating Campaigns
How Can I...
Create Campaigns
The Campaigns module in Zoho CRM helps you plan and monitor marketing campaigns in your business. Any promotional campaign, be it online or offline - such as Google AdWords, Tradeshows, PR events, TV Commercials, Referral program - requires to be meticulously planned and executed in order to for it to be effective. This is where the Campaigns module enters the picture - it helps you track a Campaign by recording details such as Budget, Actual Cost, Expected Revenue from the campaign, the duration and so on.
With these details recorded in the Campaigns module, you can run reports to see which campaigns have brought the most revenue, which ones have been too expensive, what is the ROI and so on. Make sure you use this module to plan and run your promotional campaigns efficiently.
In Zoho CRM, you can create campaigns by:
Entering data in the campaign details form: You can manually fill in the campaign details gathered from various external sources.
Importing Campaigns from external sources: You can also do a bulk import of Campaigns from a CSV or XLS file into the Campaigns module in Zoho CRM.
Create Campaigns Individually
You can create campaigns individually by:
- Filling in the details in the campaign creation form manually.
- Cloning the campaign with a few changes in the existing record.
To create campaigns individually
- In the Campaigns module, click
 (Add Button) to add a new Campaign.
 - In the Create Campaign page, enter the campaign details.
- Click Save.
To clone campaigns
- In the Campaigns tab, click a particular campaign that is to be cloned.
- In the Campaign Details page, click
 (More button) and choose Clone from the list.
 - In the Clone Campaign page, modify the required details.
- Click Save.
View Campaigns
To view campaigns individually
- In Zoho CRM, click the Campaigns tab.In the Campaigns Home page, you will be able to see a list of all the campaigns.The column named Type indicates the campaign type for example, webinar, trade show, email etc., created in Zoho CRM.
- From the list of campaigns, choose the appropriate campaign that you want to view.In the Campaign page, you will be able to see the total count of the leads and contacts associated with this campaign, you can track the cost and revenue details for this campaign and view more.

Associate Campaign with Other Records
After creating campaigns, you may need to associate campaigns with other records such as tasks, events, attachments, leads, contacts and deals.
In the Campaign Details page, you can associate the following:
- Open Activities: To add tasks and events.
- Closed Activities: To display the closed tasks and events.
- Deals: To display the deals converted through a campaign.
- Attachments: To attach documents to the campaign.
- Leads: To display the leads generated through a campaign.
- Contacts: To display the contacts generated through a campaign.
Add Leads/Contacts to the Campaign
There are many types of campaigns that can be organized. For example, Trade Shows, Direct Mailer, Telemarketing, Print or Online Ads etc. The prime focus of campaigns is to aquire information from leads who have an interest in what you offer. Many leads may be associated to a single campaign as you may have included some existing leads to take part in a particular campaign. In such cases, it is necessary that you keep track of all the leads as a result of the campaign. Using the Campaigns module, you can store all the necessary details in a well organized manner, for future reference.
Add New Leads/Contacts to the Campaign
To add new leads
- In the Campaign Details page, the existing lead details, if any, are displayed.
- Click the column headings to sort the display order of the records.
- Click the relevant Edit link to modify the campaign member status of the lead.
- Click the column headings to sort the display order of the records.
- Click the New link.
- In the New Lead page, specify the lead details.
- Click Save.
To add new contacts
- In the Campaign Details page, the existing contact details, if any, are displayed.
- Click the column headings to sort the display order of the records.
- Click the relevant Edit link to modify the campaign member status of the contact.
- Click the column headings to sort the display order of the records.
- Click the New link.
- In the New Contact page, specify the contact details.
- Click Save.
Add Existing Leads/Contacts
To add existing leads or contacts to the campaign
- Click on a record from the Campaigns module.In the Campaign Details page, the associated lead or contact details, if any, are displayed.
- Click Add Existing Leads/Contact.
- In the Add Existing Leads/Contacts page, specify the criteria to search the required records.
- Click Search.
- Under Matching Leads/Contacts, select the checkbox(es) of the records that you want to associate to the campaign.
- Select the Campaign Member Status from the Status drop-down list.
- Click Add to Campaign.The selected records will be associated to the campaign.
Import Leads or Contacts
You can import a list of leads into Zoho CRM and directly associate them to the campaign. Note that while importing, the first campaign member status will be applied to all the leads or contacts. You can later change the campaign member status whenever needed.
To import leads or contacts
- Click on a record from the Campaigns module.
- In the Campaign Details page, the associated lead or contact details, if any, are displayed under Leads/Contacts related lists.
- Click Import My Leads.
- In the Import Leads page, specify the import details.
Mass Update Campaign Member Status
The campaign member status defines the status of the leads or contacts who are part of the campaign. Note that the Status of a Lead is different from the Campaign Member Status.
To update campaign member status
- In the Campaign Details page, the associated lead or contact details, if any, are displayed.
- Click Mass Update Member Status.
- In the Mass Update Campaign Member Status page, select any of the following to get the list of records that you want to update:
- All Records - Select this option and click Fetch to list all the records.
- Manual Criteria - Select this option, provide search criteria and click Search to list records based on the criteria.
- All Records - Select this option and click Fetch to list all the records.
- Under Matching Leads/Contacts, select the checkbox(es) of the records.
- Select the Campaign Member Status from the Select the Status drop-down list.
- Click Update Member Status.The selected records will be updated with the status that you specify.
Add Campaigns to the Leads/Contacts
To add campaigns to leads or contacts
- Click the Leads/Contacts tab.
- In the Leads/Contact Details page, the existing campaign details, if any, are displayed.
- Click the column headings to sort the display order of the records.
- Click the relevant Edit or Remove link to change the member status field or remove the campaign association from the record respectively.
- Click the column headings to sort the display order of the records.
- Click Add Campaigns.
- In the Add Campaigns to Lead/Contact page, do the following:
- Select the checkbox(es) of the campaigns that you want to associate to the lead or contact.
- Choose the campaign member Status from the drop-down list.
- Select the checkbox(es) of the campaigns that you want to associate to the lead or contact.
- Click Add to Lead/Contact.
Customize Campaign Member Status
Each member associated to a campaign needs a campaign member status. For example, for a Trade Show campaign, the leads or contacts associated to it may have their status as Invited, Attended, Not Attended etc.
To customize campaign member status
- Go to Setup > Customization > Modules and Fields.
- Go to the Campaigns module and hover over the more icon.
- In the popup that appears, click Campaign Member Status.
- In the Customize Campaign Member Status pop-up, all the status values will be listed. You can do the following:
- Add Member Status - Point your mouse to any value, click the Add icon and enter a new value.(Note that you have a maximum of 50 member status values.)Click and drag the rows to re-arrage their values as required.
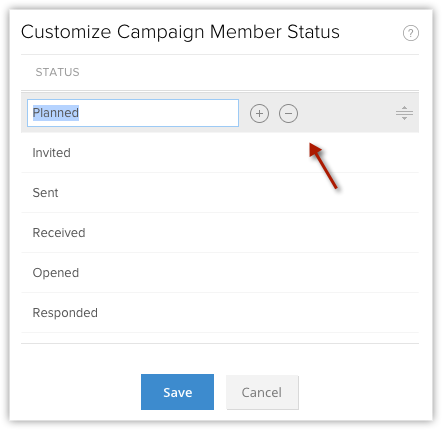
- Delete Member Status - Point your mouse to the value and click the Delete icon.
- Click Save.
Related Articles
Adding users and creating profiles
In this lecture, you will learn how to manage users and profiles, which includes: Adding users to Zoho CRM. Associating profiles to users. Creating roles.Working with Campaigns
Campaign management allows you to plan, and keep track of the campaigns in your Zoho CRM account. This includes planning the campaign, preparing your mailing list etc. In Zoho CRM, campaign management helps you to plan, execute and monitor campaigns ...Getting started with Zoho Campaigns
Create a professional-looking email in minutes using Zoho Campaigns. Zoho Campaigns: Integration with Zoho CRM
Nurture and engage your leads with the Zoho CRM and Zoho Campaigns integration.Getting the most out of Zoho Campaigns and CRM integration
Benefits of using Zoho Campaigns and Zoho CRM together.